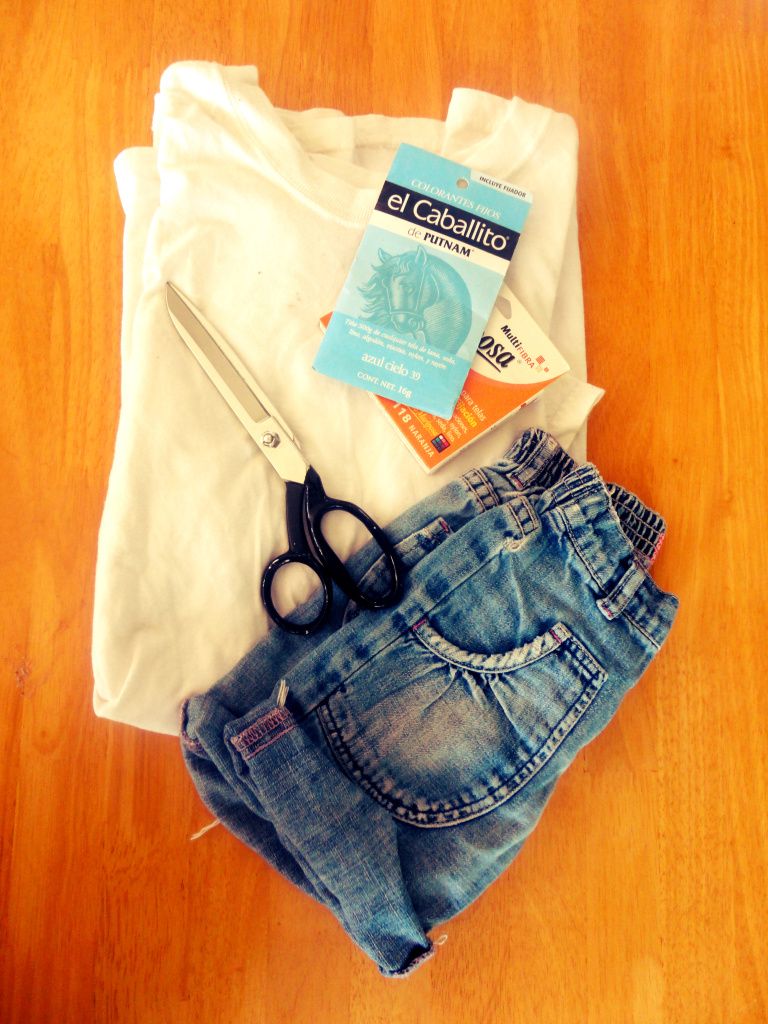
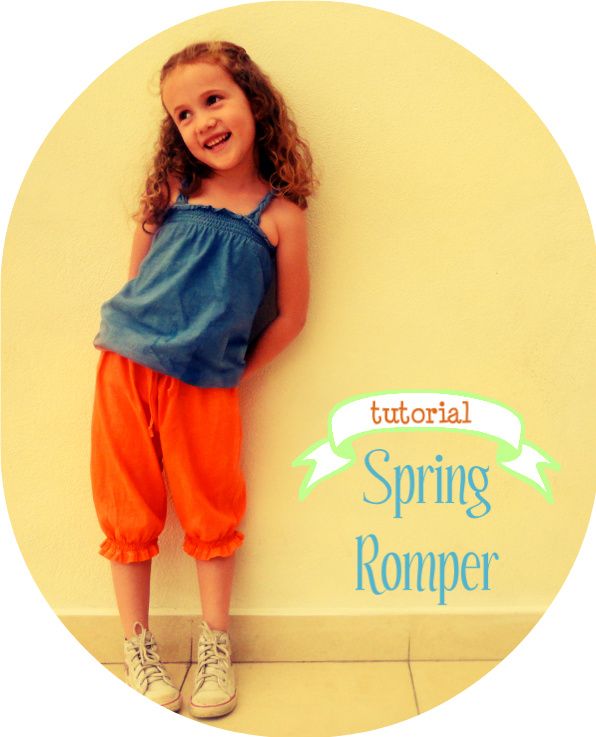
I always have a bunch of hubby´s old t´s hanging around. So I decided to recycle (there is no such thing as too much recycling) and make little G a colorful spring romper. Here´s what you´ll need:
Siempre tengo un montón de playeras viejas de Sr. O por la casa. Así que decidí reciclar (no hay tal cosa como demaciado reciclaje) y hacerle un colorido enterizo primaveral a la pequeña G. Esto es lo que necesitarás:
♥ 1 or 2 of daddy´s old white T´s. The amount of T´s depends on the size of the romper you want to make. G is a small 6 year old. Follow the same instructions for smaller sizes. You could probably make a baby romper with 1 big T. / 1 o 2 playeras viejas de papá. La cantidad de playeras que necesitas dependerá de la talla de enterizo que quieras hacer. G es una talla 6. Sigue las mismas intrucciones para tallas más pequeñas. probablemnet podrías hacer un eneterizo de bebé con una sola playera grande.
♥ a pair of shorts that fit your little one comfortably / un par de shorts que le queden comodamente a tu peque
♥ fabric dye 2 different colors / 2 diferentes colores de tinte para tela
♥ scissors / tijeras
♥ thread / hilo
♥ elastic thread / hilo elástico
♥ sewing machine or serger / máquina de coser o máquina "over"
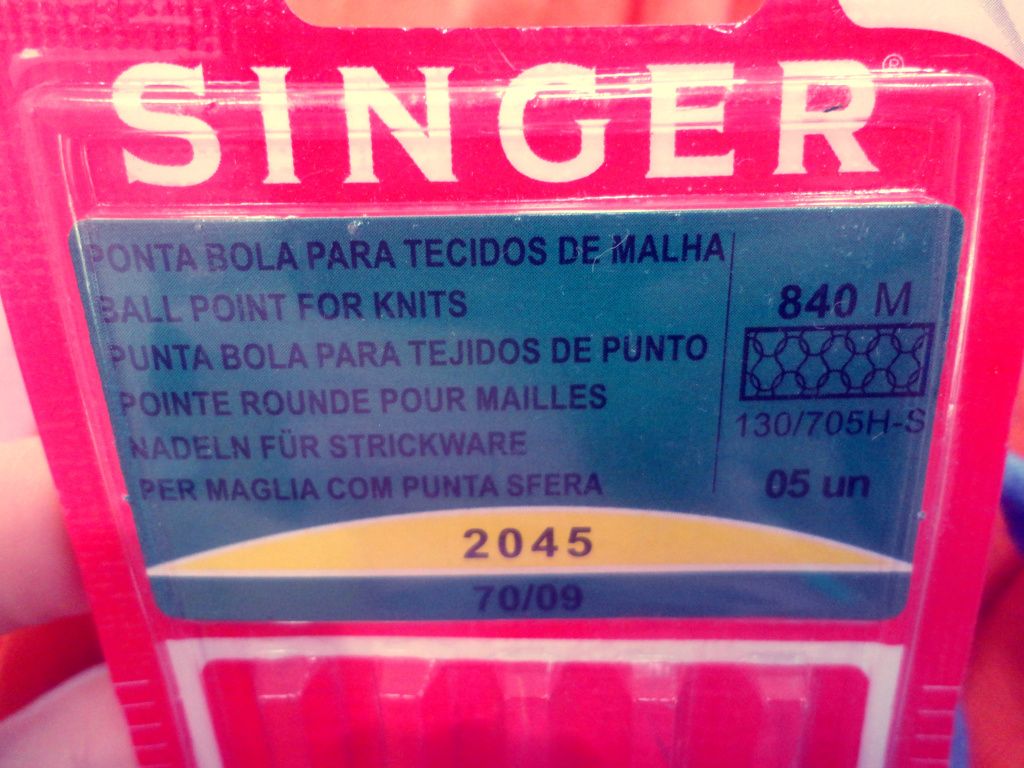
♥ 70/09 needle if you´re using a normal sewing machine, like me. We´ll be zig-zagging the whole thing together (except for the parts where shirring is required) / Una aguja 70/09 si estás usando una máquina casera, como yo. Estaremos cosiendo todo el proyecto con puntada zig-zag (con excepción de la parte donde se requiera coser con hilo elástico)
Now let´s get creative:
Ahora ejerzamos nuestra creatividad:
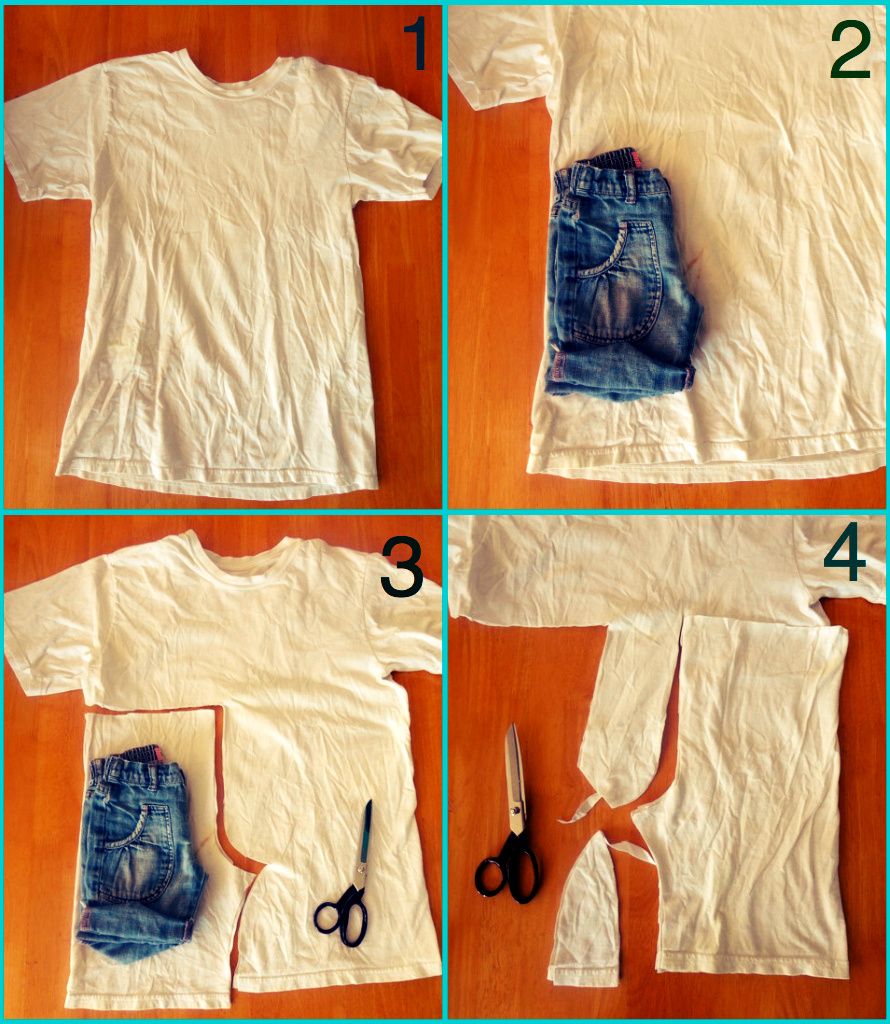
1. lay your T #1 on a flat surface / estira tu playera #1 sobre una superficie plana
2. Fold little one´s shorts as shown in the picture (pulling at the crotch) and place it on the T as shown. Leave a generous amount of space above and below the shorts / Dobla los shorts de peque como lo muestra la imágen (jalando bien el tiro) y colócalo sobre la playera como en la imágen. Deja bastante espacio arriba y abajo.
3. cut as shown (NOTE: don´t forget to leave a generous amount of space around the outline of the shorts) /corta como lo muestra la imágen (NOTA: no olvides dejar una cantidad generosa de espacio alrededor de la orilla del short)
4. Flip the piece of T you just cut over to the other side of the T. Line up with the side of the shirt and cut again, following the exact shape of your first piece. / Voltéa la pieza de playera que acabas de cortar al otro lado de la playera. Alínealo con el costado de la playera y vuelve a cortar, siguiendo la forma exacta de tu primera pieza.
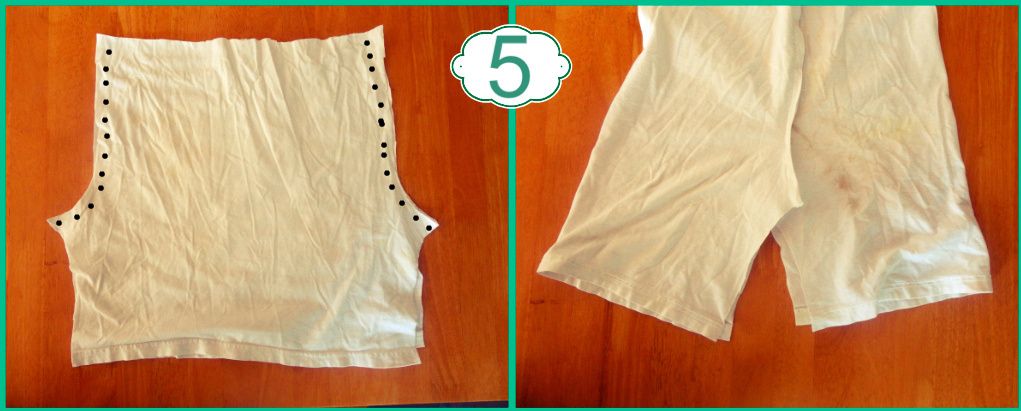
5. you now have 2 pieces of fabric that, unfolded, look like the image above (left side). Place one on top of the other (fronts facing) and sew (zig-zag) on either side from the top to the end of the curve. Now join the 2 seams you just sew so that it looks like the image on the right. Next, sew (zig-zag) the small arch you now see at the bottom, from the left leg seam to the right leg seam.
5. ahora tienes 2 piezas de tela que, desdobladas, se ven como la imágen superior (lado derecho). Coloca una encima de otra (frente con frente) y cose (zig-zag) de cada laldo de la parte superior al final de la curva. Ahora junta las dos costuras que acabas de coser para que se asemeje a la imagen de la derecha. Después cose (zig-zag) el pequeño arco que ahora ves en la parte inferior, desde la bastilla de la pierna derecha a la bastilla de la pierna izquierda.
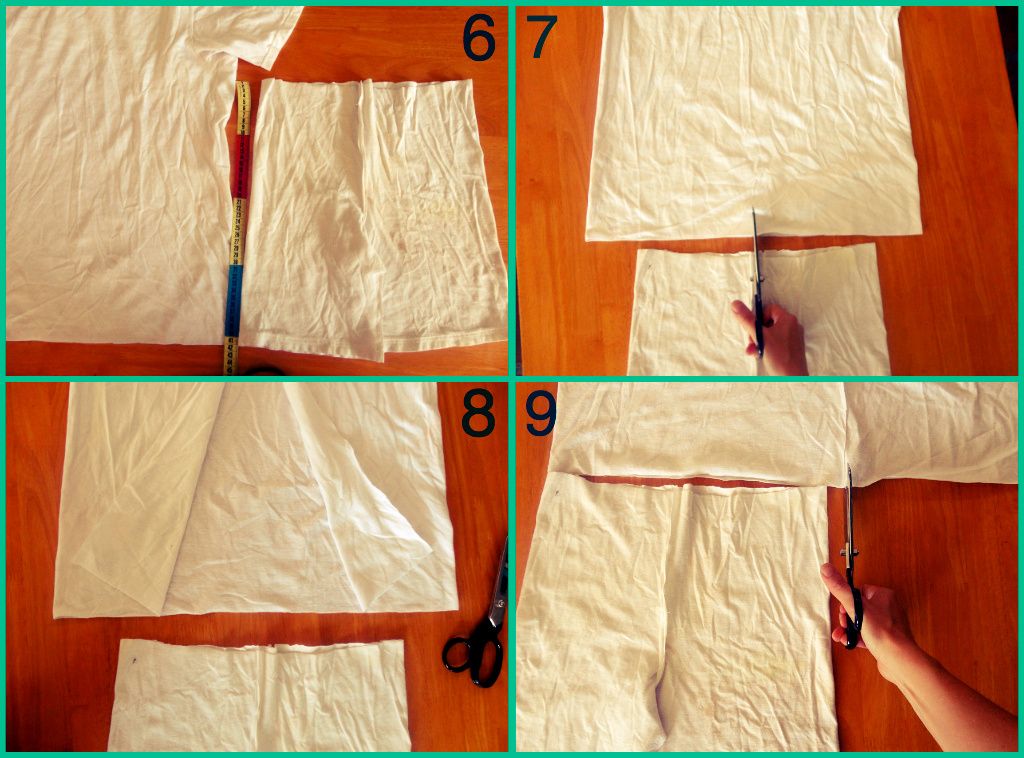
6. Grab your second T-shirt, cut the bottom seam off and save for later. Now place your 2nd T next to your "shorts" and measure the height. This is where you will cut across the (cutting the sleeve area off if you will) / toma tu 2nda playera, cortale la costura de hasta abajo y guarda esto para más tarde. Ahora coloca tu segunda playera junto a tus "shorts" y mide la altura. A esta altura es donde cortarás horizontalmente (separándo el area de las mangas por ponerlo de alguna manera)
7. Cut the top T vertically grabbing only one layer of fabric as seen in image #8 (so as to create one large rectangle) / Corta la playera de arriba de manera vertical cortando solo una de las capas de tela como se muestra en la imágen #8 (como para crear un solo rectángulo grande)
9. Fold this rectangle over so that your excess fabric is left to one side and cut about 1 inch from wider than the width of your shorts then sew (zig-zag) the edge (right side). This will create a tub-like fabric = your top / dobla este rectángulo para que el exceso de tela quede a un costado y corta a aproximadamente 2 cm de el ancho de los shorts y cose (zig-zag) el borde (lado derecho). Esto craerá una pieza de tela como tubo = parte superior del enterizo "top"

10. Lets stop for a sec and get down to the seam of the T you set aside (you can do this later if you wish). Cut the oval shaped fabrci in half so you have only 1 large strip. / Detengámonos por un momento para atender la bastilla de la 2nda player a que hemos guardado (aunque esto lo puedes hacer más tarde si prefieres). Corta la tira redonda para obtener una sola tira larga.
11. cut the strip so as to seperate the seam from the piece of fabric that folds over / corta la tira como para separar la costura de la parte de la tela que se encuentra doblada
12. once you´ve done this, pull at the strip of fabric. It will stretch and fold in over itself. Set side. / una ves que hayas hecho esto, jala la tira de tela. Se estirará y se enrollará sobre si mismo. Deja a un lado.
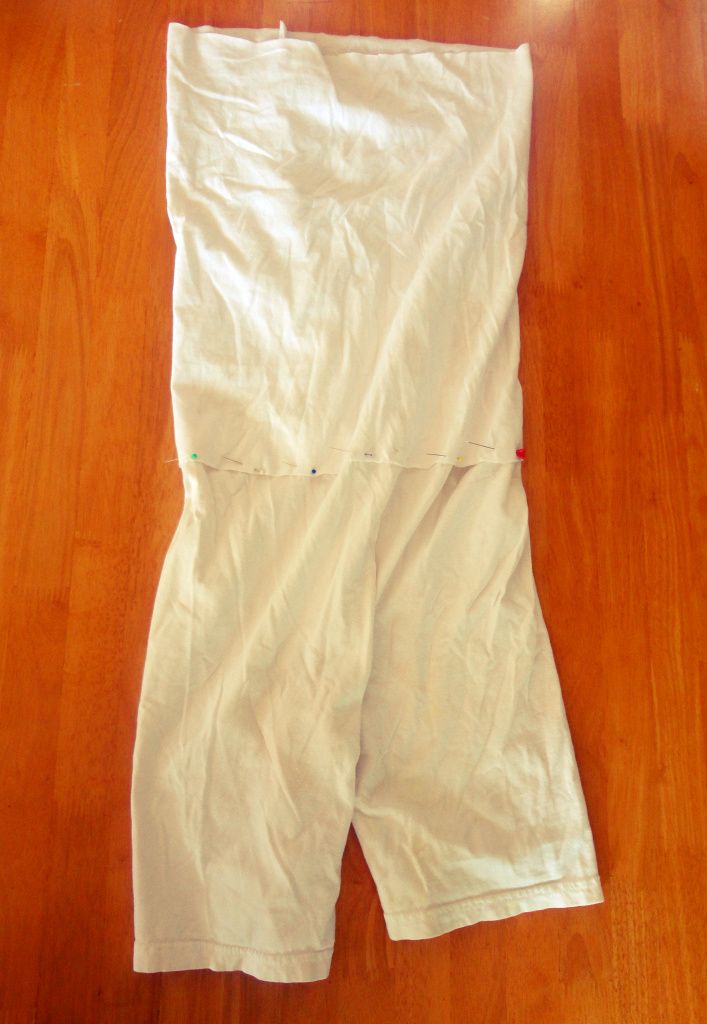
slip the top over the shorts, both pieces with right sides facing up.
desliza el "top" por encima de los shorts, ambas piezas con el lado derecho hacia afuera.

13. overlap about 2 inches and pin together / sobrepon las telas aproximadamente 4-5 cm y fija con alfileres
14. sew (zig-zag) the bottom part of the fabric overlapped on top, close to the edge / cose (zig-zag) la parte inferior de la tela que está obrepuesta por encima, cerca al borde
15. turn romper inside out and repeat step 14 on the fabric overlapping on the inside. Leave "pocket space", enough so you could slip a shoelace through / voltea el enterizo (al revés) y repite el paso 14 en la tela sobre puesta por el lado del revés. Deja un espacio como bolsillito, suficiente como para que pudiera pasar una agujeta o pasador

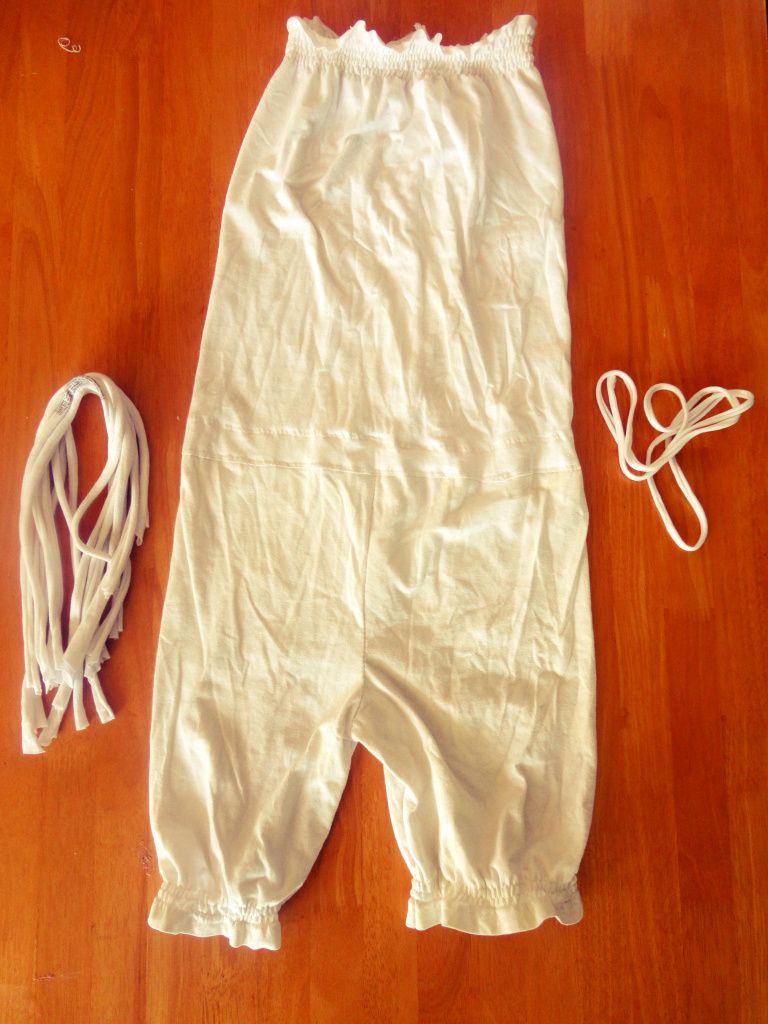
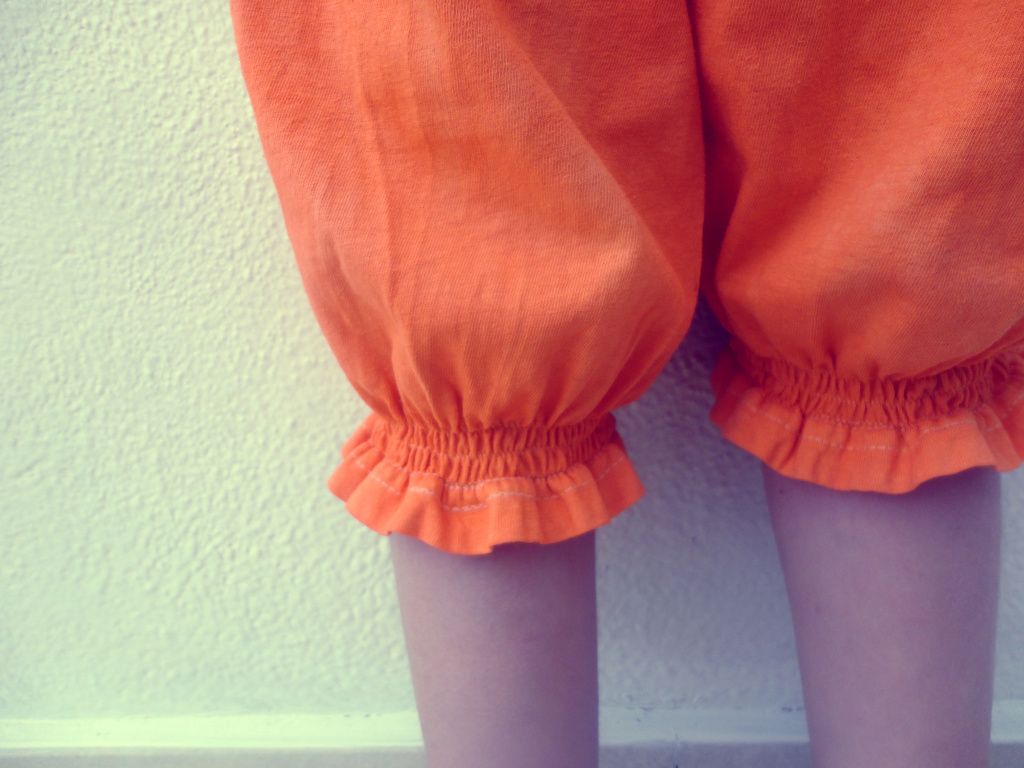
Turn romper right side out and shir 5 rows on the top (start about 1 inch from the edge). Then shir about 3 rows at the bottom of each pant leg. On the legs, begin shirring where the original seam of the t shirt ends (if you made a smaller romper and cut that seam off, then start about 1.5 inches from the bottom). Great shirring tute HERE.
Onced you´ve finished shiring, grab what ever pieces of T shirt you have left over after cutting and cut into stips, then pull taught (these will be used for the braided shoulder straps). Now all your pieces ready to get colorful!
Voltea el enterizo al derecho y frunce con elástico unas 5 filas en la parte superior del enterizo ("top") comienza como a 2 cm del borde. Después frunce con elástico unas 3 hileras en la parte inferior de cada pierna. En las piernas comienza a fruncir donde termina la costura original de la playera (si hiciste un enterizo más pequeño y cortaste esa costura, entonces comienza como a 3 cm de la orilla de la pierna). Excelente tutorial para fruncir con elástico AQUÍ.
Una ves que hayas terminado de fruncir, toma los retazos de playera que te hayan sobrado después de cortar, córtalas en tiras y estíralas (éstas serán usadas para los tirantes trenzados). ¡Ahora tienes todas las piezas necesarias para jugar con color!
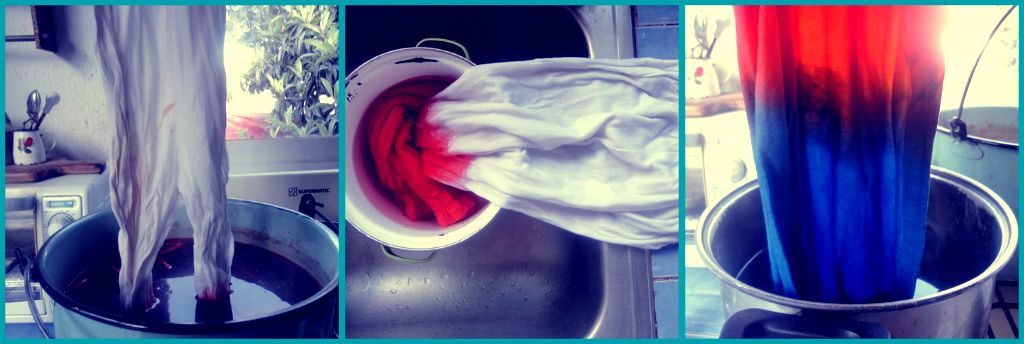
To dye, follow the instructions on the dye you´ve decided to use. Wet all your pieces of fabric before you begin. Put the first strip you cut (the one that will be used for the waist area) place in the dye, then grab the romper and dip into the dye up to a bit above the waist area. Do not let go of the romper when you do this. Dip in and pull out, repeat this until you´ve achieved a lovely, full color. Pull the romper and the 1st strip out and rinse well (only the area that has been dyed) then soak in water with vinager and salt. Let this soak for about 20 minutes. Prepare your next dye and drop in the strips cut for shoulder straps and the white half of the romper. Dip in the romper without letting go, repeat the steps used for color #1. Once you have achieved the desired color, rinse the romper and the strips well (becareful to not mix with the first dyed half of the romper). Finally, soak all your pieces of fabic in water with vinager and salt for about 40 minutes. Rinse once more, and allow to dry well.
Note: If your T-shirts happen to have grease stains on them then the dye will appear stronger on these areas of fabric
Para teñir, sigue las instrucciones del tinte que hayas comprado para diluir el tinte. Moja todas tus piezas de tela antes de comenzar. Agarra la primera tira que cortaste (la que se usará en la cintura) métela en el tinte diluido y después toma el enterizo y sumerge solo hasta un poco arriba de la cintura. No sueltes el enterizo mientras haces esto. Repite esto varias veces, sumergiendo y sacando, hasta que hayas adquirido un lindo color fuerte. Saca la tira y el enterizo, enjuaga bien (solo la parte teñida del enterizo) y sumerge en agua con vinagre y sal. Dejalo remojar unos 20 minutos. Prepara tu siguiente tinte y sumerge las tiras destinadas a tirantes y la mitad del enetrizo que sigue blanco. Sumerge sin soltar, repite los pasos empleados para el color #1. Una ves adquirido el color deseado, retira la prenda y los tirantes, enjuaga los bien (teniendo cuidado de no mezclar con la primera mitad que fue teñida). Finalmente mete todo a remojar en agua con vinagre y sal unos 40 minutos. Vuelve a enjuagar. Exprime y deja secar bien.
Nota: si es que tus playera tiene manchas de grasa, como las mías, el tinte se fijará más en estas partes de la tela
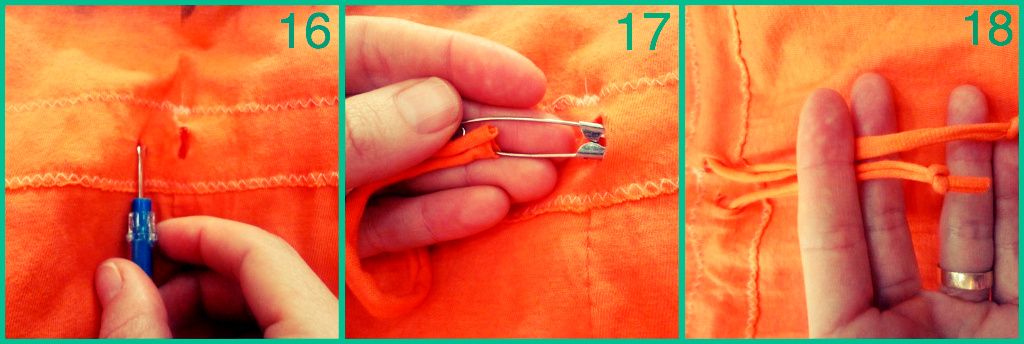
16. slit 2 small holes in the "belt area" at the front of the romper (right in the middle) / corta 2 pequeñas aberturas en el area del "cinturón" en el frente del enterizo (justo en medio)
17. attatch your "belt" strip to a baby pin and slide through all the way to the other side / atravieza un segurito (imperdible) por el extremo de tu "cinturón" y deslízalo hasta el otro lado
18. pull the strip until the two ends are about the same length, then tie a knot at each end / jala la tira hasta que los dos extramos miden más o menos lo mismo, después amarra un nudo en cada extremo
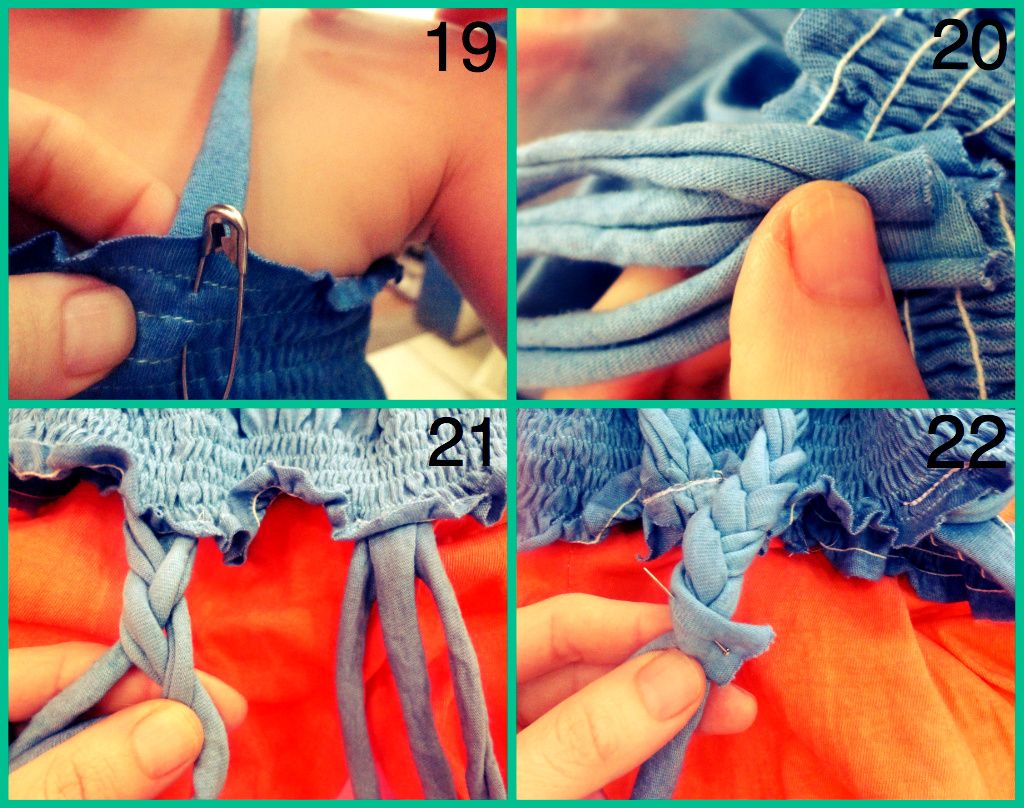
19. pin one of the shoulder straps to the front of the romper, where it fits little one comfortably / fija uno de los tirantes al frente del enterizo, donde le quede cómodo a tu peque
20. once you know where you want your shoulder straps on the front on the romper, add another 2 strips (3 per side, 6 total) and sew in place / una ves que sabes dónde quieres los tirantes en la parte frontal del enterizo, añade otras 2 tiras (3 por lado, 6 en total) y coselos bien en su lugar
21. braid your straps / trenza tus tirantes
22. pin so that the braid won´t fall apart while working / fija con alfiler para que no se deshaga la trenza mientras trabajas
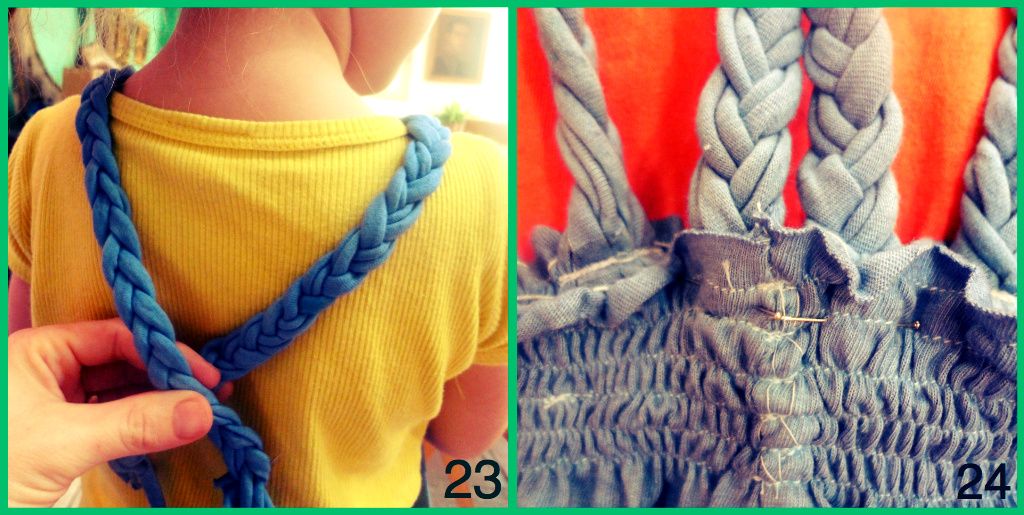
23. checking the length you need for the straps on little one, cross them over / checando el largo que necesitas para los tirantes sobre tu peque, crúzalos
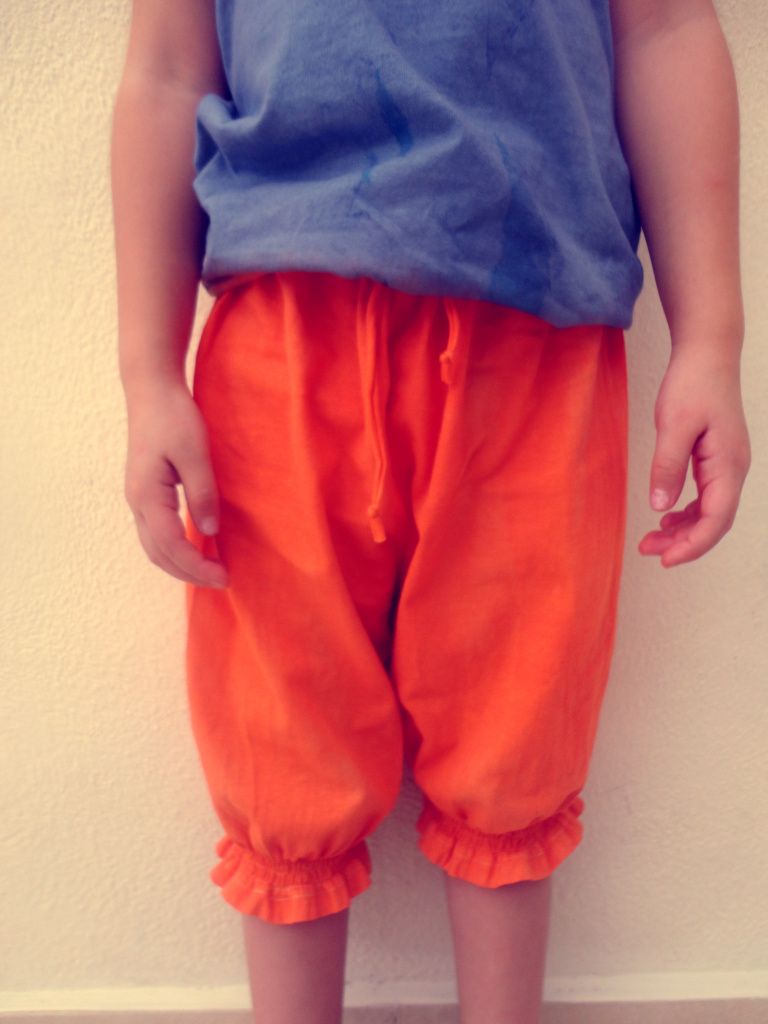
and believe it or not, all you need to do now is, put it on your little munchkin, pull the "belt" up to the waist area, tie and off to play!
24. pin them to the back and sew securely into place / fíjalos a la espalda con alfileres y coselos bien a la espalda
y aunque no lo creas, solo hace falta ponérselo a tu pequeña, jalar el área del cinturón a la cintura, amarrar y a jugar!



sharing spring:
today´s creative blog

GENIAL AMIGA, ME ENCANTO ! VOY A SEGURI LAS INSTRUCCIONES PARA HACERLE UNO A EMMA, SALUDOS PARA TODA LA FAMILIA !!!
ReplyDeleteP.D. G SE VE SUPER LINDA !!!
Hello Claudia, lovely tutorial...hope you don't mind I have pinned it onto pinterest....thankyou from Auckland, newzealand :)
ReplyDeletelove pinterest, love sharing, thankyou for pinning Gabrielle!
DeleteThis is super cute! Thanks for sharing! I may have to make one of these for my niece soon!
ReplyDeleteBeautiful tutorial! I especially like the braided straps and hand-dying. Thank you for sharing!
ReplyDeleteOh my cuteness! This is awesome! love it! I am having a Feature Friday Linky Party and I would love for you to link this up.
ReplyDeleteDanielle @ Blissful and Domestic
http://www.blissfulanddomestic.com/2012/05/feature-friday-linky-party-southern_24.html