<< >>

____________________________________________________________________________________________________________________________________________


Showing posts with label Women tutorial. Show all posts

Sunday, May 27, 2012

70´s inspired skirt-dress / falda-vestido inspiración 70´s

you´ll need / necesitarás:
scissors / tijeras
measuring tape / cinta de medir
calculator / calculadora
sewing machine (an overlock or just zig-zag your way through the tutorial)
máquina de coser (una over o simplemente realiza el tutorial con puro zig-zag)
2 pieces of fabric/ 2 piezas de tela
(piece 1: a fabric that, wrapped around your hips, fit´s loosely, comfortably...not too loose. Length: just long enough so that, sewn to piece 2, will add up to the length of skirt you desire. I made mine a maxi skirt)
(piece 2: piece1 x 1.5 = width of piece 2 )

(pieza 1: una tela que, envuelta alrededor de tus caderas, quede flojo, cómodo... no demaciado flojo. Largo: lo suficientemente largo como para que, cosido a la pieza 2, sumen el alrgo que quieres para tu falda. Yo hice del mío una falda maxi)
(pieza 2: piza 1 x 1.5 = ancho de pieza 2)


note: the pieces of fabric shown in the image below have already been folded in half  and have their front facing outward. You should fold the other way around: fronts facing.
nota: las piezas de tela de la siguiente imágen ya han sido dobladas por la mitad con el frente hacia afuera. Tu deberás doblar las telas alrevés: con los frentes hacia adentro
 

Photobucket

 now, with fabrics folded and fronts facing, sew or zig zag in the following places:

ahora, con las telas dobladas frente con frente, cose con zig-zag, en los siguientes lugares:

  Photobucket
 frunce el borde de la pieza 2 (aquí hay un buen tutorial de Ruffles n Stuff)
great ruffle tute by Ruffles n Stuff here
  Photobucket
así: 
Photobucket
adjust and move around until fabric 1 and fabric 2 fit together properly. pin together as follows and sew or zig zag together

ajusta y acomoda hasta que la tela 1 y la 2 embonen bien. fija con alfileres de la siguiente manera y cose en zig-zag para unir
  Photobucket

Photobucket
frunce con elástico varias filas alrededor de toda la parte superior de tela #1 (buen tutorial aquí)
good shirring tute here
  Photobucket 
...and you´re done! Now you can use it as a maxi skirt or as a dress with a simple belt and boho inspired accesories!

... ¡y listo! ¡Ahora lo puedes usar como falda maxi o como vestido con un cinturón y algunos accesorios de inspiración bohemia!
 Photobucket

Thursday, February 9, 2012

♥-ly Dress Tute / Tutorial Vestidito q ♥

Mamita ♥´s Lauren Moffat. Her Spring 2012 collection is absolutely dee-vine! I couldn´t help but put together my own DIY version of this blue beauty!
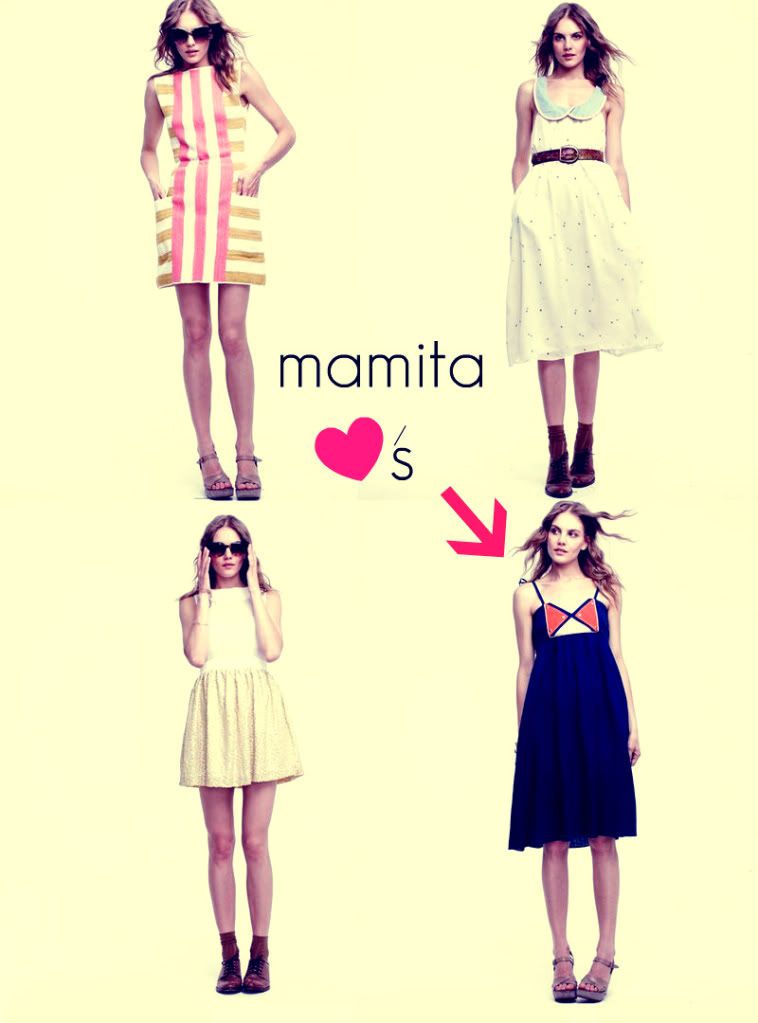
Mamita ♥ Lauren Moffat. ¡Su colección Primavera 2012 es exquisita! ¡No pude evitar armar mi propia versión de esta maravilla en color azúl y compartir el tutorial!

Photobucket

Measurements needed:

1. your bust measurement
2. the length from right below your armpit to right below your bust
3. length from right below your bust to your knees (we´ll be using this measurement at the end)
4. measure the length you want for your straps
** add 1 inch to all these measurements

Medidas necesarias:
1. circunferencia de pecho
2. largo de justo debajo de tu axila a justo debajo del pecho
3. largo de justo debajo del pecho a las rodillas (estaremos usando esta medida hasta el final)
4. mide el largo que quieres para tus tirantes
** suma 2cm a todas estas medidas


Now you will need 3 pieces of fabric to make the top section. You will calculate their measurements as follows:

♥ bust measurement divided by 2 = width for front 1 & 2
♥ length from armpit to right below bust = length for front 1 & 2 and length for back section
♥ bust measurement divided by 2 = X
X divided by 2= Y
X+Y= back
(in other words: you will need 1 and a half times the length of fabric used for the front to make the back section)

♥ a small square in a contrasting color of aprox 8 x 8 inches (this WILL vary depending on your bust size... my bust size has been the same since I was 13 years old, so bare with me and please don´t laugh.)

♥ colorful binding (I also used navy blue binding for the shoulder straps)


Ahora necesitarás 3 piezas de telapara crear la pieza de la pechera. Calcularás sus medidas de la siguiente manera:

♥ circunferencia de pecho entre 2 = ancho de piezas frente 1 y 2
♥ medida de debajo de la axila a justo debajo del pecho = largo de piezas frontales 1 & 2 y pieza de espalda
♥ medida pecho entre 2 = X
X entre 2 = Y
X+Y= espalda
(en otras palabras: necesitarás una y media veces el largo de tela necesaria para el frente para crear la parte trasera)

♥ un cuadrado de tela de color contrastante de aproximadamente 22 x 22 cm (esta medida sin duda variará dependiendo de tu medida de pecho... mi pecho ha medido lo mismo desde que tengo 13 años... asi que improvisen un poco... y eviten reírse porfavor)

♥ bies colorido (también usé bies azúl marino para los tirantes del vestido)
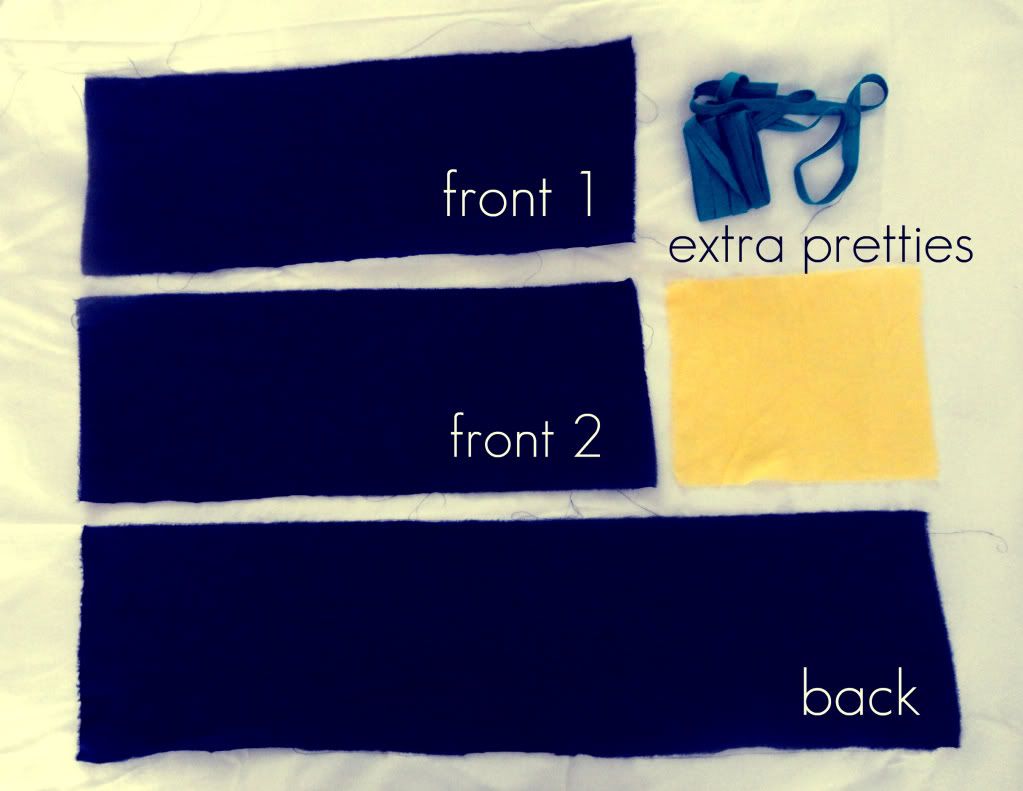
Photobucket

♥
take your square piece of contrasting fabric and, helping yourself with a ruler, trace an X from corner to corner (I used seamstress chalk, you can use any kind of chalk)
♥ following the lines: cut
♥ keep only the right and left triangles (we won´t be using the bottom and top ones)


♥ toma tu pieza de tela cuadrada y , con ayuda de una regla, traza una X de esquina a esquina (usé gis de sastre, pero puedes usar cualquier tipo de gis)
♥ siguiendo las líneas: corta
♥ quedate con solo los triángulos de la derecha e izquierda (no estaremos utilizando las de arriba y abajo)

Photobucket

♥ centra y fija los triángulos con alfileres
♥ fíjate que la distancia de la orilla de los triángulos a cada extrema mida lo mismo

Photobucket

♥ zig-zag stitch all the way around your triangles attatching them to front #1

♥ fija los triángulos a la tela del frente #1 con costura de zig-zag

Photobucket

♥ cover up these ugly stitches with the strips of your colorful binding
♥ sew close to the edge

♥ cubre estas costuras feas con tiras de tu bies colorido
♥ cose cerca de las orillas

Photobucket

♥ now grab your 2 front pieces...

♥ ahora toma tus 2 piezas frontales...

Photobucket

♥ place the straps over front #1 and place front #2 on top (fronts facing)
♥ pin the 2 fabrics together at the top holding the straps carefully in place
♥ sew only the top

♥ coloca los tirantes encima de la pieza frontal #1 y después coloca la pieza frontal #2 encima (frente con frente)
♥ fija las piezas con alfileres por la parte de arriba sujetando bien los tirantes
♥ cose solo la parte superior

Photobucket

♥
voltéa y plancha

Photobucket

now for the back:
♥ shir the whole back section (great tute HERE). I chose to only shir the top and bottom. You can shir it all if you want. Me? Too lazy.
♥ this is what is should look like from the back of the fabric. The front should show only the color of thread you´ve chosen to use.

ahora para la espalda:
♥ frunce con elástico toda la pieza trasera (tutorial bueno AQUÍ). Escogí solo fruncir la parte de arriba y abajo. Lo puedes hacer el la pieza completa si gustas. ¿Yo? Demasiado floja.
♥ así es como se debe ver tu pieza trasera desde el revés. Desde el frente solo se debe el color del hilo que hayas escogido usar.
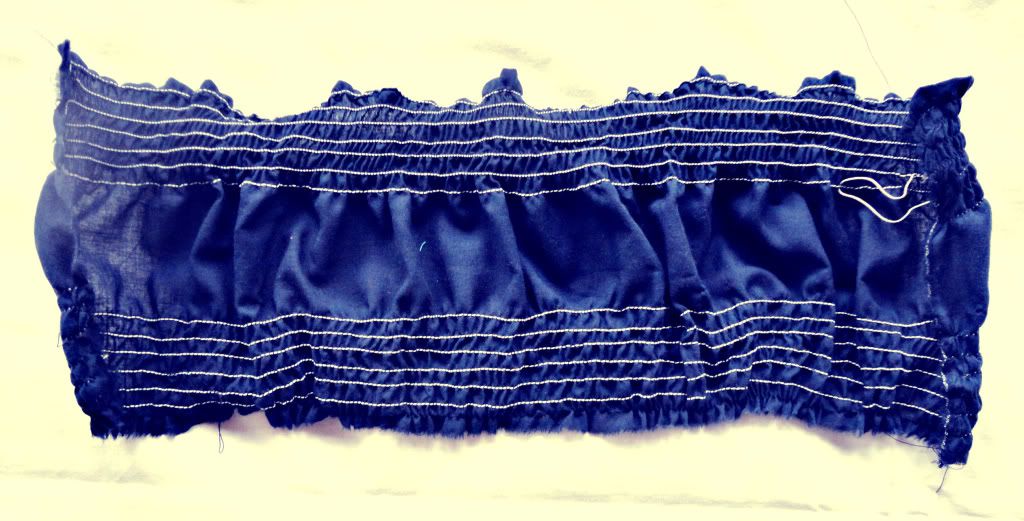
Photobucket

♥ Now you will pin the front and back section together by the sides, but before sewing, try it on (careful with the pins) just to make sure the top has a snug fit. The back should stretch just enough to make it comfortable.
♥ You might need to cut a bit of excess fabric off the back. That´s fine. Better to have left over fabric at the edges than too little.

♥ Ahora fijarás con alfileres la parte trasera con la parte frontal por los lados, pero antes de coser, pruébatelo (cuidado con los alfileres) solo para asegurarte que la pechera quede cómodamente. La espalda se deberá estirar solo lo suficiente para que quede ajustado de manera cómoda.
♥ Puede ser que necesites cortar un poco de tela de los costados de la parte trasera. Está bien. Es mejor que sobre un poco de tela a que falte.
♥ una ves que estés segura que te queda perfecto, cose la orillas
♥ termina las orillas con zig-zag
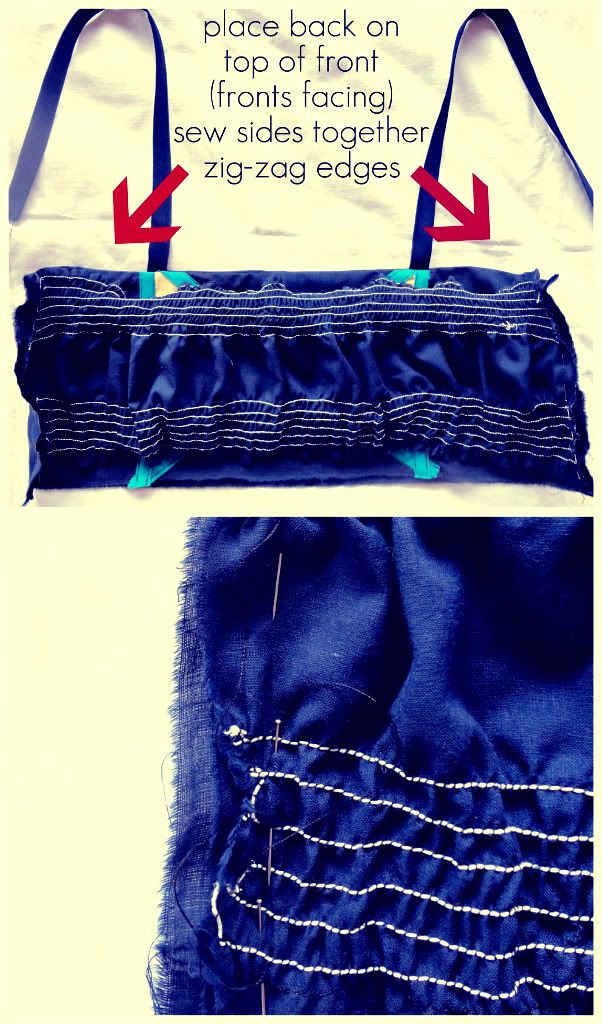
Photobucket

Now for the skirt section:


♥ length: use measurement #3
♥ width: bust measurement divided by 2 = X
X + bust measurement = skirt width
(in other words: you will need 1 and a half times the length of fabric used for the entire top for the skirt width)

Ahora para la sección de la falda:

♥ largo: use medida #3
♥ ancho: medida circunferencia pecho dividido entre 2 = X
X + circunferencia pecho = ancho de falda
(en otras palabras: necesitarás 1 y media veces el largo de tela utilizado para todo la pechera para el ancho de la falda)
♥ cose el costado de la falda, terminando las orillas con zig-zag
♥ cose la bastilla de la parte inferior de la falda

Photobucket

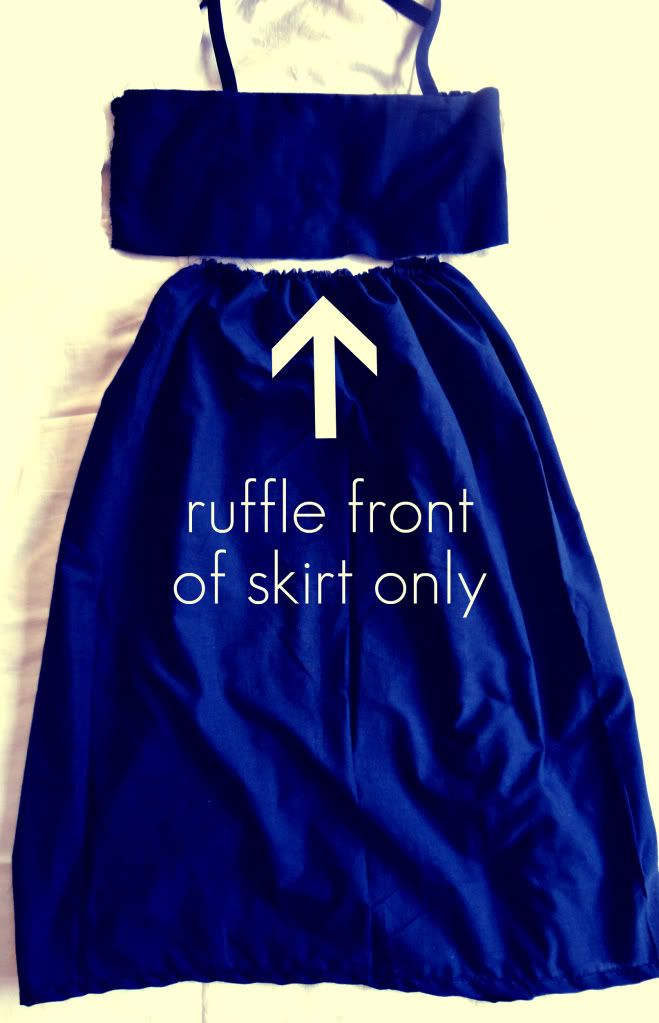
♥ now ruffle: tute HERE

♥ ahora frunce la parte superior de la falda sólo por el frente: tutorial AQUÍ
Photobucket

Photobucket

♥
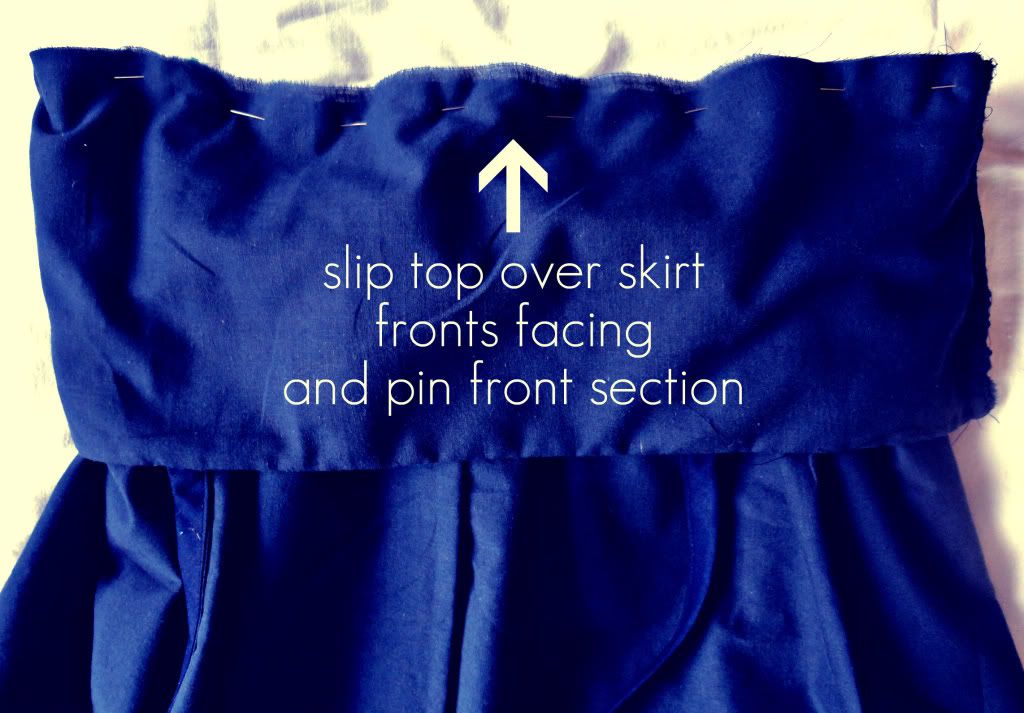
sew along the edge, joining the top with the skirt
♥ sew the front section first taking the pins out as you go
♥ when you get to the back section pull at the top (the shirred part of the top) until the length of the skirt and top match
♥ finish sewing all around as you pull
♥ zig-zag the edges
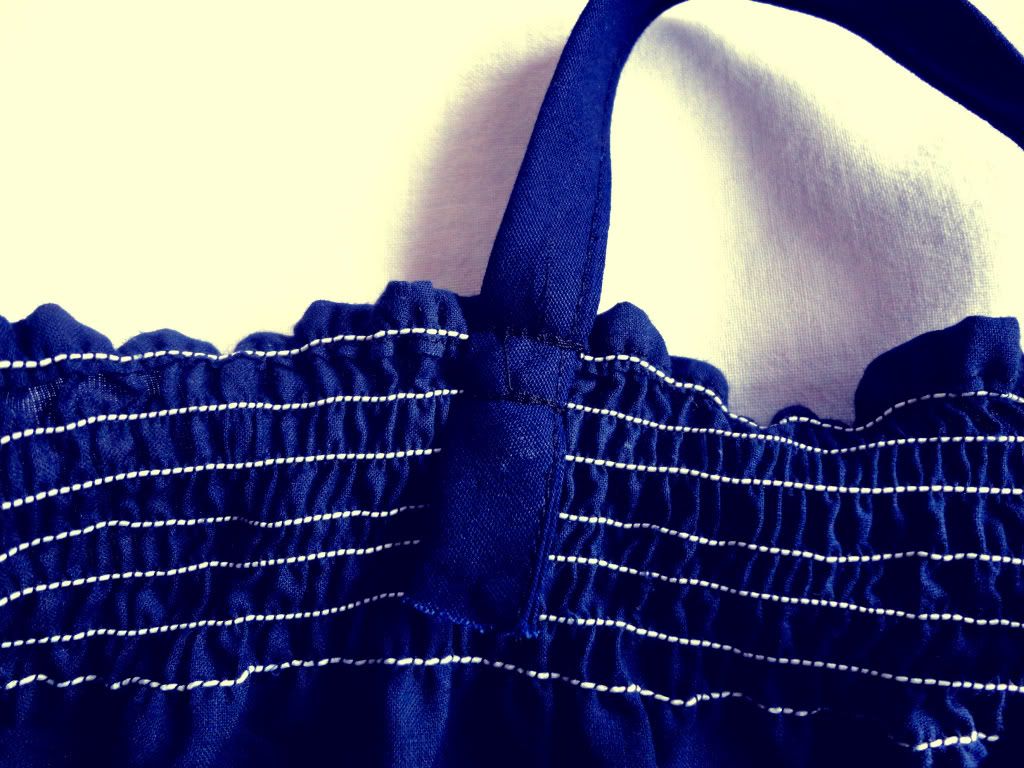
♥ sew the loose ends of the straps to the back (twice each side for extra hold)

♥ desliza la pechera por encima de la falda, frente con frente, emparejando la orilla inferior de la pechera con la orilla superior de la falda
♥ fija solo la parte frontal con alfileres
♥ cose al borde, uniéndo la falda con la pechera
♥ cose la parte frontal primero, retirando los alfileres conforme vayas avanzando
♥ cuando llegues a la parte trasera, jala la pechera (la parte fruncida con elástico) hasta que el largo de la falda y la pechera se emparejen
♥ termina de coser toda la orilla mientras jalas
♥ termina las orillas con zig-zag
♥ cose los extremos sueltos de los tirantes a la espalda (doble costura por tirante para darle soporte extra)
Photobucket

♥and you´re done!♥

♥¡y terminamos!♥

Photobucket

Photobucket

Photobucket

Photobucket

Saturday, December 19, 2009

Lap Top Bag Tutorial / Tutorial: Bolsa para Laptop

Christmas Present #2
Just called my sis to tell her NOT to visit my blog until AFTER Christmas... so if you´re reading this Mina, I´M WATCHING YOU!
Regalo de Navidad #2
Acabo de marcarle a mi hermana a decirle que NO puede visitar mi blog hasta después de la Navidad...así es que, si estas leyendo esto Mina, ¡TE ESTOY VIENDO!As I was saying, my sister Mina works in cinematography and TV (sabrinalmandoz)and she´s always walking around with her , now very sad, sad, laptop. Life has not treated it kindly, so I thought a bag would be the perfect present. I chose turquoise linen for the exterior, and pink cotton for a bright interior.
Como deciá , mi hermana Mina trabaja en Cine y Televisión (sabrinalmandoz) y permanentemente carga con su, ahora, triste, triste laptop. La vida no lo ha tratado con gentileza, así que pensé que una bolsa sería el regalo perfecto. Escogí lino turquesa para el exterior, y algodón rosa para un llamativo forro.Cut out a piece of fabric of 30 by 12 inches of each fabric (in my case, 1 of the linen and 1 of the cotton). This is one long strip that, later on, we will fold in half.
note: please measure the laptop you are going to make the bag for before cutting fabric, they may vary in size.
Corta un pedazo de 76cm por 31 cm de cada tela escogida (en mi caso, 1 del lino y 1 del algodón). Esto es una tira larga que, más adelante, doblaremoa por la mitad.
nota: favor de primero medir el laptop que llevará la bolsa antes de realizar cortes ya que pueden variar en tamaño.More cutting, now for the arm strap. You can either cut out two strips of contrasting colors (5 inches wide, and the length depends on how tall and long the person that will be carrying the bag is. When measuring, make sure to give it room to stitch and to make it a comfortable length. I made mine 37 inches long), or just one strip of fabric, 10 inches wide if your not looking for contrast(remember the length issue!). Sow long sides together, right sides facing, leaving both ends open. Turn inside out when finished (please note my absolutely beautiful cutting technique, worth showing the world, huh? Favor: no one remind me I actually posted something that looks like I cut with my feet instead of my hands, thankyou).

A cortar más, ahora para el "mango" de la bolsa. Puedes, ya sea, cortar 2 pedazos de tela de colores contrastantes (13 cm de ancho y el largo depende de la altura de la persona que estará cargando la bolsa. Al medir, recuerda dejar espacio para la costura y hacerlo de un largo cómodo, yo lo hice de 93 cm), ó una sola tira de de 26 cm de ancho si no buscas algo con contraste (¡recuerden el asunto del largo!). Unelos por los lados largos, anverso contra anverso, dejando los extremos abiertos. Al terminar dele la vuelta al "mango" (favor de notar mi hermosa técnica de cortado, vale la pena enseñarselo al mundo, no? Un favor: nadie me recuerde que me atreví a postear algo que parece que corté con los pies en ves de las manos, gracias).Once you´ve turned "inside out" or "outside in" (whatever, I´m confused, as ussual) it´s gonna look puffy. So iron the seams flat and then iron again so you end up with the seams on the sides.
Una vez que hayas volteado el "mango", encontrarás que tienes algo medio esponjoso. Así que plancha las costuras hasta que queden planos y vuelve a planchar la tira para dejar las costuras a los lados
This is what it will look like.
Así es como se verá.
Sow close to the edges, just to make it a bit sturdier (remember laptops aren´t that light).
Coce los extremos, algo cerca al borde, solo para darle un poco más de resistencia (recuerda que las laptops no son tan ligeras).This is what it will look like.
Así es como se verá.Zig zag the sides you left open. Cut off any fraying that may be left.
Coce en zig zag los extremos que dejaste abiertos. Corta hebras que queden colgando.Now for the bag. Make a "sandwich"... put the two fabrics together, right sides facing, and stick the "guata" in the middle (sorry, I really have no idea how you translate that: puffy stuff that comes rolled up but doesn´t fall apart when handled). Pin together so that it won´t move. Note: This is a shorter version, easier to take pictures of, yours should look way longer.
Ahora para la bolsa. Has un "sandwich"... pon las dos telas, anverso contra anverso, y coloca la guata, previamente cortada, entre ellas. Fija con alfilers para evitar que se mueva. Nota: Ésta es una versión más corta, más fácil de tomarle fotos, el tuyo debe ser mucho más largo.Sow from one corner aaalllll the way to the other corner of the long rectangular "sandwich" you now have. Then fold (be careful to leave the color you want on the outside facing inward). Sow the two sides closed, leaving the "top" open. Turn "inside out", grab some extra fabric or basting to finish off the "top" (where the laptop slides into the bag).
Coce de una esquina hasta la ooootra esquina de este largo y rectangular "sandwich" que ahora tienes. Después dobla (cuida dejar el color que quieres que quede por fuera en la parte de adentro). Coce los dos lados, dejando la parte de arriba sin cocer. Voltea la bolsa, agarra algo de tela que hay sobrado o bies para el acabado de la parte superior de la bolsa (por donde entra la laptop).

(above)

Pin the arm strap onto the side of the bag (where the seam is), it´s going to be a bit wide, that´s so you can ruffle it up just a bit and give it a little poofy femenine touch. Sow it on TWICE. Don´t sow twice in the same place, one on top and one slightly below the first one. This will give it extra support.

(arriba)

Fija el "mango" a los costados de la bolsa (donde se encuentran las costuras) con alfileres. Vas a encontrar que es algo ancho, esto es para permitir dos pinzas pequeñas y darle un toque femenino. Cocelo DOS VECES en su lugar. No repitas las costuras en el mismo logar (aunque si le debes de dar varias repasadas a cada una),haslo una ves arriba y otra ves ligeramente debajo del primero. Esto le dará soporte extra.

(below)

Take a very long strip of fabric (same one you used for the exterior), and cut it 9 inches wide. Leave it long. Fold in half (right sides facing), you´ll now have a long strip about 4 1/2 inches wide. Pin in place. Sow long side together, leaving ends open. Turn "right side out". Start hand sowing on to the front of your bag (I placed small felt pocket on the back of the bag for the laptop cables and connection stuff), ruffling as you go. Start in the middle, makeing your way around the place where you started. Don´t ruffle in an even manner, this way it´ll look a bit more "natural", and it´ll give it moore poof. At this stage you can go as far as you want. Make the flower as big and as poofy as your heart desires. I put a small leave to one side. Go crazy!

(abajo)

Toma una tira de tela muy larga (de la misma tela que usaste para el exterior de la bolsa) y cortalo de 23cm de ancho. Dejalo largo. Dobla a la mitad (anverso contra anverso), en este punto tendrás una tira de como 11.5cm de ancho. Fija con alfileres. Coce el lado largo, dejando los dos extremos abiertos. Voltéalo. Comienza a cocer a mano a la parte del frente de tu bolsa (yo coloque un bolsillo de fieltro en la parte de atrás para los cables de la laptop), ve pinzando conforme avances. Comienza en el centro, y ve girando alrededor de ese punto abriendo camino. No recomiendo crear pinzas de manera pareja, ve inventando, así le darás una apariencia más "natural". Esto también le dará más volumen. A estas alturas puedes llevar la flor tan lejos como quieras, hazlo tan grande y pachona como se te antoje. ¡Atrevete!

This is what it´ll look like, or hopefully, better! Don´t forget to share your creations with me!

Así es como se verá, o quizá, ¡mejor! ¡No se te olvide compartir tus creaciones conmigo!